

Table of Contents
- Essential Equipment and Tools for Latte Art Beginners
- How to Steam Milk for Latte Art: The Foundation
- The Espresso Foundation: Crema and Shot Quality
- Step-by-Step Pouring Technique for Latte Art at Home
- Latte Art Patterns for Beginners: Heart and Rosetta
- Troubleshooting Latte Art: Common Mistakes and Fixes
- Practice Tips and Progression for Consistent Results
- Frequently Asked Questions
How to Make Latte Art at Home for Beginners
Last Updated: July 2, 2026
Learning latte art at home is achievable once you master milk steaming, espresso quality, and pouring technique. The barrier isn't talent, it's understanding fundamentals. Get the microfoam texture right, dial in your espresso shot, and the pouring technique becomes almost mechanical.
Essential Equipment and Tools for Latte Art Beginners
You don't need professional-grade equipment to start. An espresso machine with a steam wand, a stainless steel steaming pitcher, and quality coffee beans form your foundation.
Your steaming pitcher matters most. Stainless steel pitchers with a spout designed for pouring give you better control. A 12-ounce pitcher works best for single cups. A basic kitchen scale helps you measure espresso doses consistently, building muscle memory faster than guessing.
Budget-Friendly Equipment Hacks
You can start with equipment costing under $300 total. A manual espresso maker (like a Moka pot) produces enough pressure for practice shots. Restaurant supply stores sell commercial-grade stainless steel pitchers for $15-25, often outperforming consumer "latte art" pitchers costing three times as much.
A hand grinder (burr grinder) costs $30-50 and teaches you grind consistency through tactile feedback. Cuppari Coffee's freshly roasted beans work exceptionally well with hand grinders because the beans' density and freshness make grinding easier and more consistent.
How to Steam Milk for Latte Art: The Foundation
Steaming milk properly determines whether you end up with dry foam or silky microfoam, the difference between mediocre latte art and café-quality designs.
Start with cold milk straight from the refrigerator. Position the steam wand so the tip sits just below the milk surface, angled toward the pitcher's wall. This creates the whirlpool motion that incorporates air while developing texture.
Submerge the wand fully once you've incorporated air for 3-5 seconds. The milk should make a soft chirping sound during aeration; loud hissing indicates over-aeration. Keep the pitcher moving slightly downward as the milk heats to prevent scorching and ensure even texture.
Achieving Silky Microfoam Texture
Microfoam is tiny, uniform bubbles suspended throughout the milk, not the thick foam that sits on top of cappuccinos.
The stretching phase comes first. Keep the steam wand tip just below the surface for 3-5 seconds while the milk expands. You should hear a soft chirping sound. This phase typically adds 1-2 ounces of volume to 8 ounces of starting milk.
The incorporation phase follows. Submerge the wand fully and position it to create a whirlpool motion. Continue steaming until the pitcher becomes too hot to hold comfortably (around 155°F). This breaks down large air bubbles into uniform microfoam.
The texture should look glossy and smooth, not bubbly. When you pour it into an espresso shot, it should flow without separating.
Non-Dairy Milk Art: Oat, Almond, and Soy Options
Oat milk performs best for latte art among non-dairy options. It has similar fat and protein content to dairy milk, creating nearly identical microfoam. Oat milk steams slightly faster than dairy milk, so watch the temperature carefully.
Soy milk works well but requires slightly different steaming technique. Reduce your stretching phase by 1-2 seconds since soy froths more easily. The foam is slightly less stable than dairy milk, so pour quickly after steaming.
Almond milk struggles with latte art because it lacks sufficient protein to create stable microfoam. Choose brands with added protein or stabilizers if you must use it.
The fundamental steaming technique remains identical across all milk types. Start with dairy or oat milk while learning, then experiment with alternatives once you've mastered the basics.
The Espresso Foundation: Crema and Shot Quality
Latte art requires solid espresso. Poor shots won't hold designs properly, and weak crema makes pouring nearly impossible.
Crema is the golden-brown layer of emulsified oils and gases on top of an espresso shot. Thick, stable crema holds microfoam in place during pouring. Thin or absent crema means designs collapse immediately.
Crema forms when hot water forces pressurized carbon dioxide out of coffee grounds. Freshness matters enormously. Beans roasted more than 4 weeks ago produce minimal crema because CO2 has already escaped. Cuppari Coffee roasts beans only after your order is placed and ships the same day, ensuring maximum freshness and strong crema.
Pull shots at 9 bars of pressure for 25-30 seconds. If the shot runs too fast (under 20 seconds), the grind is too coarse. If it runs too slow (over 35 seconds), the grind is too fine. Use fresh, quality coffee beans, single-origin espresso blends and medium-dark roasts typically produce thicker crema than light roasts.
Step-by-Step Pouring Technique for Latte Art at Home
The pour is the final piece, but it's worthless without proper milk texture and espresso quality.
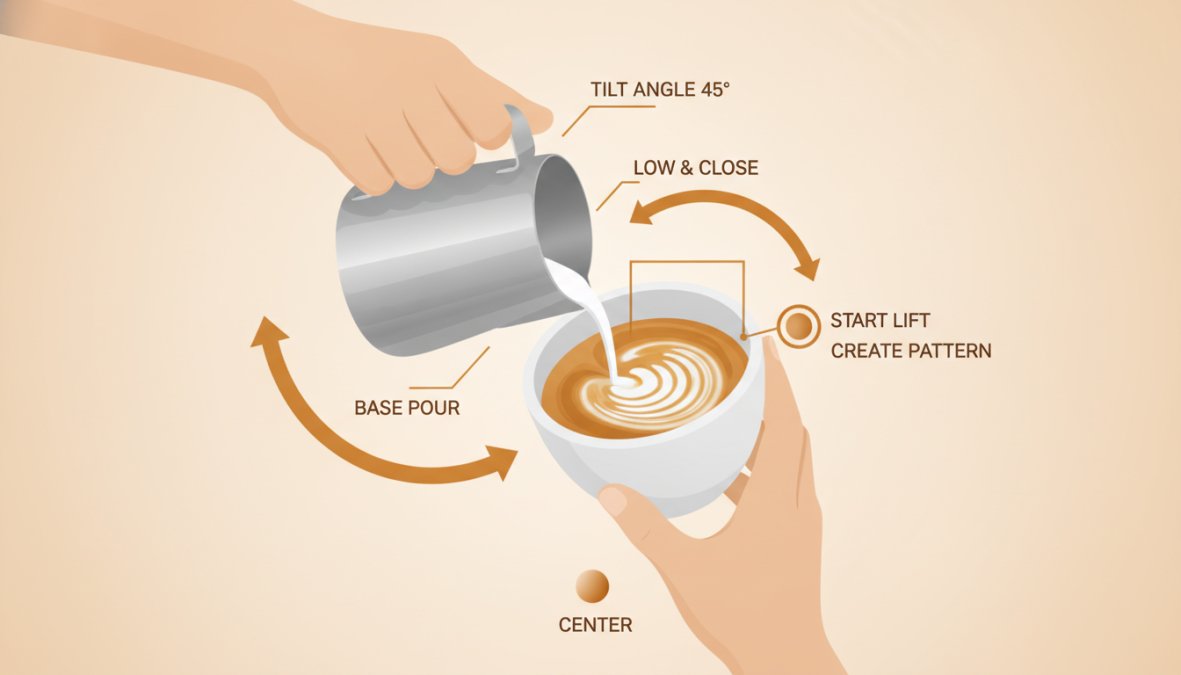
Start with your espresso shot already in the cup. Tilt the cup slightly away from you at a 20-degree angle. Pour from a height of 4-6 inches initially, aiming for the center. Pour steadily until the cup is about three-quarters full.
Lower the pitcher to 1-2 inches from the cup surface. This is where the design forms. The microfoam should now be the primary component flowing from the pitcher. Move your pouring hand in controlled motions, side-to-side for rosettas or a specific pattern for hearts. Your body should move with the pour, not just your wrist.
Cup Geometry and Positioning
Cup shape dramatically affects latte art visibility and difficulty. Wide, shallow cups make designs easier to execute and more visible. The ideal latte art cup has a 3-4 inch diameter and 3-4 inch height.
White or cream-colored cups show designs clearly. Dark cups make designs nearly invisible. Position your cup so the handle points toward your non-dominant side. Warm your cup before pouring by running hot water through it and discarding it. Cold cups cool the milk rapidly and cause microfoam to separate.
Latte Art Patterns for Beginners: Heart and Rosetta
Two patterns form the foundation for all latte art. Master these before attempting more complex designs.
Pouring the Heart Pattern
The heart is the most intuitive pattern for beginners. It requires fewer movements and forgives minor mistakes more gracefully than rosettas.
Start with your standard pour, high from 4-6 inches, aiming for the cup's center. Fill the cup until it's about two-thirds full. Lower the pitcher to 1-2 inches from the cup surface.
Move the pitcher in a straight line away from you while pouring. Continue this motion for 2-3 inches, creating a white line through the espresso. Stop the milk flow abruptly while keeping the pitcher positioned above the cup. Immediately move the pitcher back toward you, crossing the white line you just created. The milk will spread and form the heart's rounded top.
Creating the Rosetta and Tulip
The rosetta requires more control but opens doors to advanced designs.
Pour your base layer as before, filling the cup two-thirds full. Lower the pitcher close to the surface. Position the pitcher so the milk stream creates a thin white line. Move the pitcher side-to-side (1-2 inches left and right) while slowly pulling backward. The motion should be smooth and rhythmic.
Continue this side-to-side motion for 4-5 inches, creating multiple leaf-like segments. On the final backward motion, move the pitcher slightly higher and pull through the design to create the stem.
Both patterns require 20-30 practice attempts before consistent execution.
Troubleshooting Latte Art: Common Mistakes and Fixes
Most latte art problems trace back to three issues: milk texture, espresso quality, or pouring technique.
Problem: Designs disappear immediately after pouring. Check that your espresso shot has thick, golden crema. If crema is thin, your beans may be old or your grind too coarse. Ensure you're incorporating enough air during the stretching phase.
Problem: Large bubbles appear in the milk. You're incorporating too much air during steaming. Reduce your stretching phase to 2-3 seconds. Listen for a soft chirping sound; loud hissing means pull the steam wand out slightly.
Problem: Milk separates from espresso instead of blending. Your milk is too hot or too thin. Check that the pitcher feels hot but not scalding (around 155°F). If the milk looks watery, extend the stretching phase by 1-2 seconds.
Problem: Designs look flat or lack definition. You're pouring from too high or moving too slowly. Lower the pitcher to 1-2 inches from the cup surface and move with confident, deliberate motions.
Problem: The cup overflows before the design finishes. Use a 1:3 or 1:4 espresso-to-milk ratio. A double shot (2 ounces espresso) pairs with 6-8 ounces of milk.
Visual Troubleshooting Guide
| Problem | Cause | Fix |
|---|---|---|
| Weak or missing crema | Beans too old or grind too coarse | Use fresh beans (under 4 weeks old), adjust grind finer |
| Large bubbles in foam | Over-aeration during steaming | Reduce stretching phase to 2-3 seconds |
| Milk separates from espresso | Milk too hot or texture too thin | Cool milk to 155°F, increase air incorporation |
| Design lacks definition | Pouring from too high or too slowly | Lower pitcher to 1-2 inches, move with confidence |
| Cup overflows | Too much milk for espresso volume | Use 1:3 or 1:4 espresso-to-milk ratio |
Practice Tips and Progression for Consistent Results
Consistency comes from deliberate practice. Start by perfecting milk steaming before attempting designs. Spend 5-10 practice rounds just steaming milk without pouring.
Practice one pattern at a time. Master the heart pattern completely before moving to rosettas. Spend at least 20-30 attempts on a single pattern before switching.
Keep a practice log. Note which attempts succeeded and which failed. Track variables: milk temperature, espresso grind, pouring height, pitcher movement speed. Patterns emerge after 50-100 attempts.
Practice with fresh Cuppari Coffee beans. The consistency of freshly roasted beans eliminates variables caused by stale coffee, letting you focus purely on technique.
Record videos of your pours. Watching playback reveals technique issues invisible during live execution. Set realistic milestones: Week 1, achieve consistent microfoam; Week 2, complete three successful heart pours in a row; Week 3, attempt rosettas; Week 4, combine patterns.
Most home baristas quit before reaching the point where latte art becomes enjoyable. The 4-6 week learning curve feels long when you're pulling mediocre pours. Start with excellent coffee that makes every attempt feel rewarding. Cuppari Coffee delivers freshly roasted beans guaranteed to produce thick crema and rich espresso flavor, eliminating one major variable so you can focus purely on technique.
Frequently Asked Questions
Can you make latte art with a regular coffee machine?
Making latte art requires a steam wand to create microfoam, so standard drip coffee makers won't work. You need an espresso machine or steam-capable device. However, budget-friendly manual espresso makers with basic steam wands are available. Some home baristas use handheld milk frothers combined with strong coffee as a workaround, though results won't match traditional latte art with proper microfoam and espresso crema.
What is the best milk for latte art at home?
Whole milk is the gold standard for latte art because its fat content creates stable microfoam and smooth texture. However, oat milk has emerged as the best non-dairy alternative, offering similar steaming properties and foam consistency. Avoid skim milk initially, it produces dry foam. If using non-dairy options, choose barista-blend varieties formulated for steaming, as they incorporate better and hold their foam longer than regular plant-based milks.
How do you steam milk for latte art at home?
Position your steam wand just below the milk surface to incorporate air during the stretching phase, creating microfoam. Submerge the wand deeper during the incorporation phase to heat the milk while maintaining texture. Aim for a whirlpool motion in your pitcher. The milk should reach 150-155°F for optimal foam consistency. Purge your steam wand before and after to prevent buildup. Practice keeping the pitcher steady and the wand angle consistent for silky microfoam.
Why won't my milk foam for latte art?
Common issues include using the wrong milk (skim foam differently than whole milk), incorrect steam wand positioning, or insufficient aeration during the stretching phase. Water temperature matters, if your espresso machine isn't hot enough, foam won't develop properly. Check that your steam wand isn't clogged and that you're tilting your pitcher correctly. Non-dairy milks require barista-blend formulations. Start with whole milk to isolate variables, then experiment with other options once you've mastered the technique.
This article was written using GrandRanker