

Table of Contents
- What a WDT Tool Does and Why It Matters
- WDT Technique for Espresso: Step-by-Step
- WDT Needle Size for Espresso: Choosing the Right Tool
- Espresso Channeling Causes and How WDT Prevents Them
- Espresso Puck Preparation: Timing WDT in Your Workflow
- Troubleshooting: When WDT Helps and When It Doesn't
- Cleaning, Storage, and Tool Safety
- Frequently Asked Questions
Last Updated: October 12, 2026
What a WDT Tool Does and Why It Matters
A WDT tool is a small handheld stirrer with thin needles that breaks up clumps in ground coffee before you tamp.
When you grind coffee, fine particles stick together and form clumps, leaving dense pockets and loose gaps in the portafilter basket.
Channeling ruins shots in two ways: water rushing through under-extracts (sour, thin), while water struggling through dense pockets over-extracts (bitter, dry).
WDT Technique for Espresso: Step-by-Step
The core WDT technique for espresso takes about 15 to 20 seconds: stir the grounds with thin needles in small circles, then level and tamp. The details below make it repeatable rather than random.
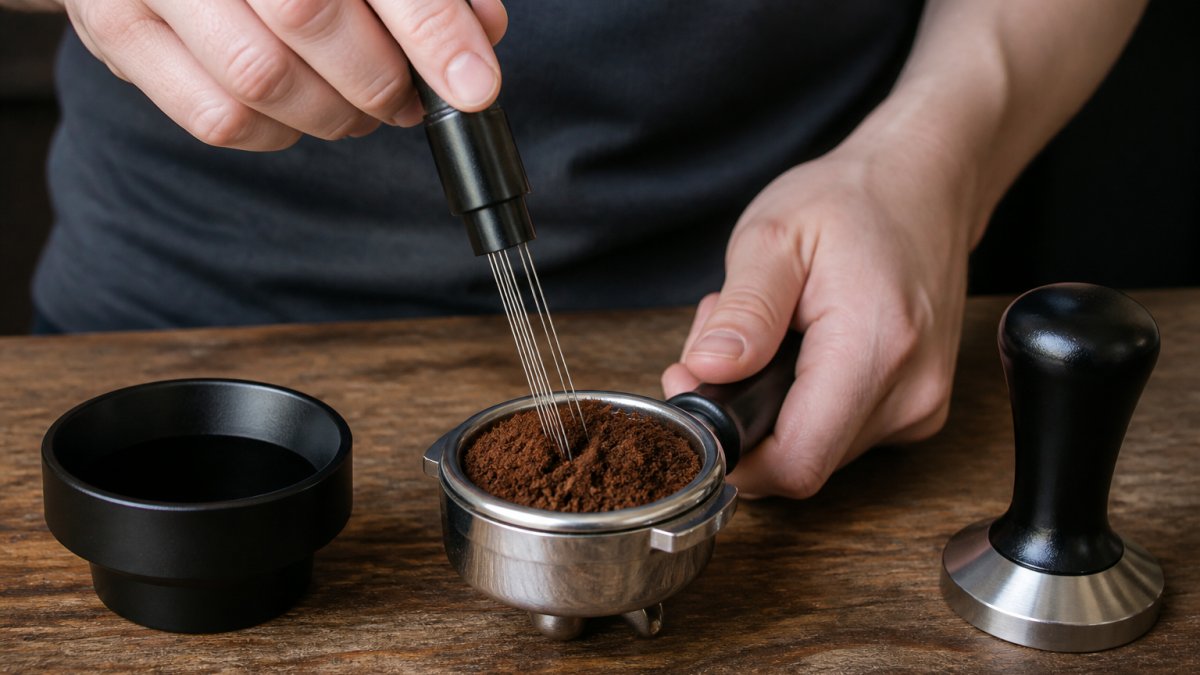
Step 1: Prepare the Portafilter and Basket
Start with a dry, clean portafilter basket; leftover grounds from the last shot will throw off your dose.
- Wipe the basket with a dry cloth.
- Set it on a level surface or a tamping mat.
- Grind your coffee dose straight into the basket.
- If your grinder or dosing cup causes spillage, place a dosing funnel on top of the basket first.
A dosing funnel keeps grounds inside the basket while you stir and gives your WDT tool room to move without dragging coffee over the edge.
Weigh your dose on a scale and keep it the same every time; consistent dosing makes every later step easier to judge.
Step 2: Stir With Thin Needles Using a Circular Motion
Here is a repeatable version you can copy.
Pattern. Work in a defined path so you cover the whole bed:
- Start at the center of the basket.
- Move outward in small circles, roughly 1 to 2 cm in diameter, spiraling toward the wall.
- Sweep once around the inner wall to catch grounds stuck at the edges.
- Spiral back toward the center.
Speed. Slow and steady, about one circle per second gives the needles time to separate clumps instead of flinging grounds.
Passes. Two to three full passes (center-out, wall sweep, back to center) usually suffice for a standard 18 to 20 g dose.
Grip. Hold the tool like a pencil, with your wrist relaxed. Let the needles do the work; your hand only guides them.
Step 3: Level the Grounds and Tamp
Pull the tool straight up and out; dragging it sideways carves a trench through the bed.
- Tap the portafilter once or twice on the mat to settle the grounds.
- Remove the dosing funnel if you used one.
- Level the surface with a leveling tool or a gentle shake.
- Tamp straight down with even pressure.
- Give the tamper a light twist to polish the surface, then lift it cleanly.
Your puck should look flat and even, with no cracks or soft spots. If not, the issue is usually the stir, not the tamp.
A Repeatable Test You Can Run
To check whether your motion works, run a side-by-side comparison:
- Pull one shot using your normal routine with no WDT.
- Pull a second shot with the same dose and grind, but add the WDT steps above.
- Track four things: shot time to your target yield, how the flow looks (steady vs. spurting), whether the spent puck shows holes or craters, and how the shot tastes.
Repeat this three or four times on different days. Most practitioners find WDT shots run more consistently, but improvement depends on your grinder, beans, and basket. If you see no difference across several trials, WDT may not be solving a problem you have.
WDT Needle Size for Espresso: Choosing the Right Tool
The best WDT needle size for espresso is around 0.3 to 0.4 millimeters in diameter, thin enough to separate clumps without pushing grounds around, stiff enough to reach the bottom of the basket.
Here is what to look for in a tool:
| Feature | What to Look For | Why It Matters |
|---|---|---|
| Needle diameter | 0.3-0.4 mm | Splits clumps without moving the bed |
| Needle count | 5-9 needles | Covers the basket in fewer passes |
| Needle length | Reaches basket floor | Breaks clumps at every depth |
| Handle | Comfortable grip | Keeps your motion steady |
| Needle tips | Rounded or blunt | Reduces scratching and snags |
Too-thick needles act like tiny spoons, pushing coffee into new piles instead of breaking clumps apart. Too-thin needles bend on the first stir and stop reaching the bottom.
The tool matters less than the motion: a basic 3D-printed stirrer with the right needle size beats an expensive tool used carelessly.
OutIn Fino Portable Electric Coffee Grinder →
Where does the grinder fit in? A grinder that produces uniform particles gives you less to fix. The OutIn Fino Portable Electric Coffee Grinder uses patented technology for uniform grind size, with 28 grind levels plus stepless micro-adjustment.
Espresso Channeling Causes and How WDT Prevents Them
Espresso channeling causes come down to uneven density in the puck. Water finds the path of least resistance, and any weak spot becomes a channel.
WDT prevents channeling by removing weak spots before they form: stirring breaks clumps and spreads grounds evenly, so density stays consistent and water has no single easy path.
Watch for these signs of channeling:
- Sour and bitter in the same shot. Part of the puck under-extracts while another part over-extracts.
- Fast, gushing flow. The shot finishes well before your target time.
- A hole or crater in the spent puck. Water punched through one spot.
If your shots show these signs and your grind setting is close, WDT is often the next fix to try.
Espresso Puck Preparation: Timing WDT in Your Workflow
Espresso puck preparation follows a fixed order: dose, stir, level, tamp, pull. WDT sits between dosing and leveling.
- Dose. Grind your weighed coffee into the basket.
- Stir. Run the WDT tool through the full depth of the bed.
- Level. Settle and flatten the surface.
- Tamp. Press straight down with even pressure.
- Pull. Lock in and start the shot.
The whole routine adds about 15 seconds to your workflow, a small cost for a repeatable shot.
Timing inside the stir matters too: stir for 10 to 15 seconds. Less leaves clumps behind; much more starts to undo the even bed you just built.
If you use a portable setup, keep the routine identical. The Nano Portable Espresso Machine takes ground coffee or capsules and reaches up to 198°F at 20 bars of pressure.
Troubleshooting: When WDT Helps and When It Doesn't
WDT helps most when shots taste inconsistent from one pull to the next. If one shot is sour and the next bitter with no routine change, uneven distribution is a likely cause, but not every symptom points there. Use the table below to match what you see to the most likely cause, then work through the fixes in order.
| Symptom | Likely puck-prep cause | Other possible causes |
|---|---|---|
| Sour and bitter in the same shot | Clumps or uneven density creating channels | Grind too coarse or too fine; water temperature off |
| Fast, gushing flow finishing well before target time | Channel formed by a weak spot in the bed | Grind too coarse; dose too low for the basket |
| Slow, dripping flow that never reaches target yield | Over-compacted bed or too fine a grind | Dose too high; basket clogged with fines |
| Spurting or spraying from the bottomless portafilter | Channeling from clumps or a cracked puck | Tamp tilted; basket not seated evenly |
| Hole or crater in the spent puck | Water punched through one spot | Uneven tamp pressure; dose too low |
| Pale, uneven crema | Extraction never came together | Stale beans; temperature too low |
| Shot-to-shot inconsistency with no routine change | Uneven distribution from clumps | Grinder retention; dose drift; bean aging |
Working Through the Fixes in Order
Start with the cheapest, most reversible change and move down the list:
- Check your dose. Weigh it. If it drifts shot to shot, fix that before anything else.
- Check your grind. If every shot runs too fast or too slow, adjust the grind before changing your technique.
- Check your tamp. A tilted tamp creates a wedge of uneven density that WDT cannot fix.
- Add or refine WDT. If dose, grind, and tamp are consistent and you still see channeling, distribution is the next variable to address.
When WDT Does Less
WDT is a tool for a specific problem, not a ritual you must perform. It adds little when:
- Your grinder produces very few clumps. Some grinders and some beans clump far less than others. If your spent puck already looks even and your shots are consistent, WDT may not change anything you can taste.
- Your beans are stale. Old coffee behaves differently no matter how well you stir. Freshness matters more than distribution.
- Your water temperature is off. Temperature swings change extraction more than distribution does. Fix the temperature first.
How to Know If WDT Is Actually Helping
Do not assume WDT improves your shots. Test it. Pull a set of shots without WDT, then a set with it, keeping dose, grind, and tamp identical. Track shot time, yield, flow behavior, and taste. If you cannot taste or measure a difference across several trials, WDT is not solving a problem you have, and you can drop it from your routine without losing anything.
Cleaning, Storage, and Tool Safety
Clean your WDT tool after every session; coffee oils build up on the needles and turn rancid, leaving a stale taste in later shots.
- Rinse the needles under warm water.
- Wipe them dry with a soft cloth. A Barista Towel Set works well here, with one side for absorbing residue and one for polishing.
- Store the tool in a small cup or case with the needles pointing up.
- Keep it away from the edge of the counter.
Needle safety is worth a moment: the tips are sharp enough to prick a finger if you reach into a drawer blindly.
Check the needles once a month. Bent or rusted needles stir unevenly and can scratch your basket.
Frequently Asked Questions
How deep should WDT needles go into the coffee?
Push the needles down until they touch the bottom of the portafilter basket, then lift slightly and stir. You want to reach the lowest layer of grounds without scraping metal. For a standard 20g basket, that means about 20-22mm of depth. Adjust based on your dose and basket size. Going too shallow leaves clumps at the bottom, while forcing the needles can bend them or scratch the basket.
Should you use a WDT tool before tamping?
Yes. WDT comes after dosing and before tamping. The sequence is: dose your coffee into the basket, stir with the WDT tool to break up clumps and redistribute grounds, level the bed, then tamp. If you tamp first, the puck compresses and the needles can't reach the clumps underneath. Following this order gives you the even density that supports consistent extraction.
Can using a WDT tool make espresso worse?
It can if you use the wrong needle size or stir too aggressively. Needles thicker than 0.4mm can push grounds around without breaking clumps. Stirring in a fast, random pattern can create new uneven spots. Over-stirring with deep, forceful motions may also disturb the basket's bottom. Stick to thin needles, a gentle circular motion, and consistent depth for best results.
What is the best WDT technique for espresso?
The best WDT technique for espresso uses thin needles (0.3-0.4mm) inserted to the bottom of the basket. Stir in slow, overlapping circles for 10-15 seconds, then sweep outward to level the bed. Keep the tool vertical and avoid lifting it mid-stir. This motion breaks clumps, redistributes fines, and creates even density before you tamp. Pair it with a dosing funnel to keep grounds contained.
A great shot starts with even distribution and fresh coffee. Cuppari Coffee roasts beans only after an order is placed and ships the same day, so what lands on your counter is at its best. We offer single origin, blends, and pods, with free shipping on all U.S. orders. Get started with Cuppari Coffee and pull a more consistent espresso from your very next bag.