

Table of Contents
- What Is Coffee Blooming and Why Does It Happen?
- How to Bloom Coffee: Step-by-Step Instructions
- Best Coffee Bloom Ratio: How Much Water to Use
- Coffee Blooming Time: How Long Should You Wait?
- Degassing Coffee Beans: Why Freshness Changes Everything
- How Coffee Blooming Affects Flavor Profile and Extraction
- Coffee Blooming Across Brewing Methods: Pour-Over, French Press, and More
- Troubleshooting a Failed Coffee Bloom
- Frequently Asked Questions
Last Updated: May 22, 2026
What Is Coffee Blooming and Why Does It Happen?
Understanding what is coffee blooming is the single most important concept separating mediocre home brews from genuinely great cups. At Cuppari Coffee, we see this step skipped constantly, and it's the first thing we address when customers ask why their specialty beans taste flat. Coffee blooming is the process of pre-wetting ground coffee with a small amount of hot water before the main brew, which causes the grounds to swell and release trapped carbon dioxide gas. Below, we'll show you exactly how to bloom correctly, what a perfect bloom looks like, and why your roast level changes everything.
Here's what most guides get wrong: they treat blooming as optional. It isn't. The CO2 locked inside freshly roasted beans actively resists water absorption. If you skip the bloom, that gas creates uneven saturation across the coffee bed, resulting in weak, under-extracted, or bitter brews.
The Role of Carbon Dioxide in Coffee Blooming
Carbon dioxide is the engine behind the bloom. During the roasting process, organic material inside the coffee bean breaks down and generates CO2, which gets trapped within the bean's cellular structure. When you grind those beans, you expose far more surface area, and that gas begins escaping immediately.
The problem is timing. Pour hot water directly over un-bloomed grounds and the escaping CO2 creates a barrier between the water and the coffee particles. Water cannot saturate the grounds evenly, which means extraction becomes inconsistent. Some areas of the coffee bed get over-extracted while others barely contribute flavor at all.
The Degassing Process Explained
Degassing is the gradual release of CO2 from roasted coffee beans over time. It begins the moment roasting ends and continues for days or weeks depending on storage conditions, grind size, and roast level.
Degassing coffee beans too long before brewing is actually the opposite problem from blooming. Beans that have fully degassed are stale. Beans still actively off-gassing are fresh. The bloom is your real-time indicator of where your beans sit on that spectrum. A vigorous bubble means freshness. A flat, barely-responsive coffee bed means the CO2 is already gone, and so is much of the aroma.
According to the Specialty Coffee Association's resources on coffee chemistry, CO2 plays a direct role in preserving volatile aromatic compounds, which is why freshly roasted beans produce noticeably more complex flavor profiles.
How to Bloom Coffee: Step-by-Step Instructions
Blooming coffee takes under two minutes and requires no special equipment beyond what you already use for pour-over or drip coffee. The process is identical across most brewing methods, with minor timing adjustments.
Here are the steps:
- Grind your coffee fresh. Use your target grind size for the brewing method. Coarser for French press, medium for pour-over, medium-fine for drip coffee maker.
- Heat water to the correct temperature. Target 195-205°F (90-96°C). Boiling water at 212°F can scorch grounds and mute delicate acidity.
- Add grounds to your brewer. For a pour-over or Chemex, place a filter and add grounds. Gently level the coffee bed.
- Pour twice the weight of water as coffee. If you're using 20g of coffee, pour 40g of water. This is the standard bloom ratio.
- Pour slowly and evenly. Start in the center and spiral outward to saturate all the grounds. Do not flood the bed.
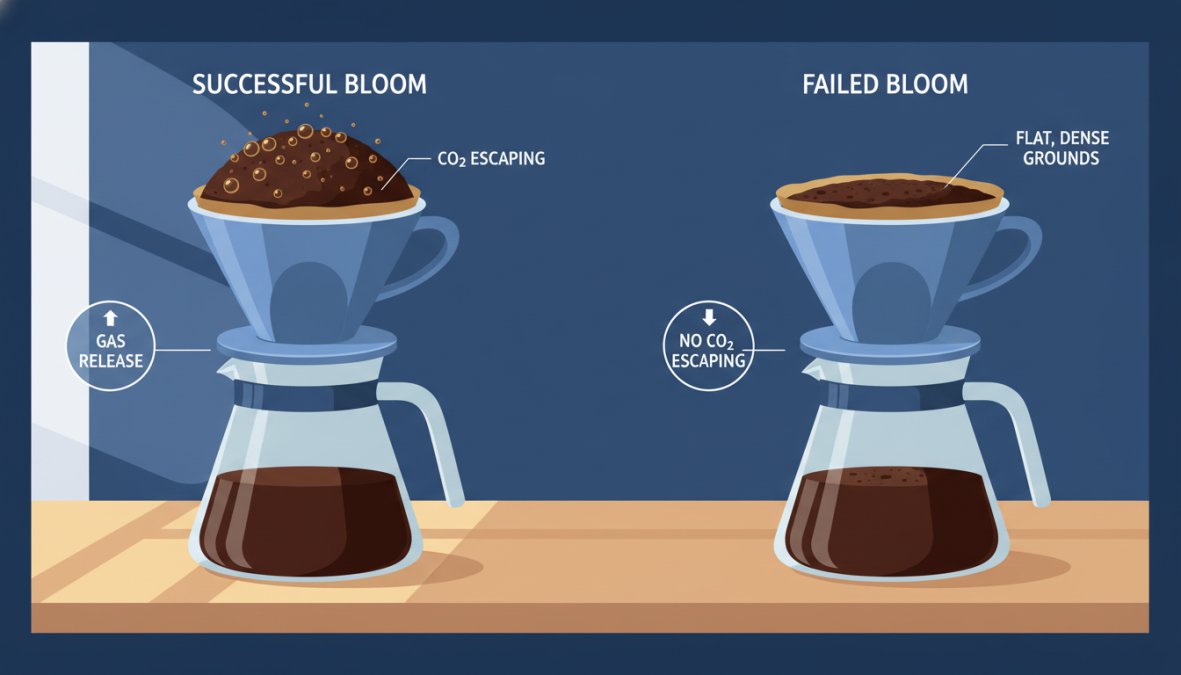
- Wait 30-45 seconds. Watch the bloom. You should see the coffee bed swell and bubble.
- Continue with your main pour. Once the bloom settles, proceed with the rest of your brewing water.
Water Temperature Impact on Bloom
Water temperature affects the bloom more than most barista guides acknowledge. Too cool and the CO2 releases slowly, extending your required bloom time. Too hot and you risk pre-extracting bitter compounds before the main brew even starts.
The sweet spot is 200°F (93°C) for medium roasts. Light roasts benefit from slightly hotter water, around 205°F (96°C), because their denser cellular structure requires more thermal energy to open up. Dark roasts are more porous and respond well to slightly cooler water, around 195°F (90°C), to avoid over-extraction during the bloom phase itself.
A common mistake is using water straight off the boil without a 30-second rest. That extra heat is rarely necessary and often counterproductive with darker roasts.
Best Coffee Bloom Ratio: How Much Water to Use
The best coffee bloom ratio is 2:1 water to coffee by weight. For 15g of coffee grounds, use 30g of water. For 20g, use 40g. This ratio consistently saturates the coffee bed without over-diluting the grounds before extraction begins.
But the 2:1 rule is a starting point, not a law. The right ratio for your specific situation depends on three variables most guides skip entirely: roast level, grind size, and water mineral content.
Why Roast Level Changes the Ratio
Dark roasts are structurally more porous than light roasts because prolonged heat breaks down more of the bean's cellulose matrix. That porosity means water penetrates quickly and CO2 escapes fast. For dark roasts, the standard 2:1 ratio is usually sufficient, adding more water risks pre-extracting bitter soluble compounds during the bloom phase before the main brew even starts.
Light roasts are denser. Their intact cellular structure slows both water absorption and CO2 release. A 3:1 ratio (three grams of water per gram of coffee) gives the water more contact time and surface coverage to fully saturate a dense bed. Without enough bloom water, you'll see dry patches in the center or edges of the coffee bed, which become under-extracted zones in the final cup.
Medium roasts sit in the middle. The 2:1 ratio works reliably here, and it's the safest default if you're unsure of your roast level.
| Coffee Dose | Bloom Water (2:1) | Bloom Water (3:1) | Best For |
|---|---|---|---|
| 15g | 30g | 45g | Standard pour-over, medium roast |
| 20g | 40g | 60g | Chemex, larger brews, light roast |
| 25g | 50g | 75g | Dense single-origin light roasts |
| 30g | 60g | 90g | French press, any roast level |
Why Grind Size Affects How Much Bloom Water You Need
A coarser grind has larger particles with less total surface area exposed. Water moves through a coarse bed quickly, which means bloom water drains before it fully saturates the grounds. If you're grinding coarse for French press or a cold brew concentrate, lean toward the higher end of the ratio, closer to 3:1, to compensate.
A finer grind has dramatically more surface area and holds water longer. Fine grinds for espresso-adjacent methods or AeroPress can work at 2:1 without dry patches because the water has more contact points and slower drainage.
Water Mineral Content and Bloom Ratio
This is the angle almost no guide addresses: soft water and hard water behave differently during the bloom. Soft water (low mineral content, below roughly 50 ppm total dissolved solids) has lower surface tension and penetrates coffee grounds more aggressively. With soft water, a strict 2:1 ratio can over-saturate a medium roast and cause the bloom to collapse too quickly, reducing the CO2 release window.
Hard water (above 150 ppm TDS) has higher surface tension and wets grounds more slowly. If you're brewing with hard tap water, a 3:1 ratio helps ensure full saturation despite the water's reduced penetration rate. If your bloom consistently looks uneven or patchy despite fresh beans and correct technique, water hardness is a plausible culprit worth investigating before you change anything else.
How to Adjust the Ratio in Practice
Start at 2:1 for any roast. Pour slowly in a spiral, saturate the entire bed, and observe the bloom for the first 15 seconds. If you see dry patches that don't wet out within 10 seconds of the pour, increase to 2.5:1 on your next brew. If the bloom collapses immediately and the bed looks soupy rather than domed, reduce to 1.75:1 or slow your pour rate. The ratio and the pour speed work together, a slower pour at 2:1 often achieves the same saturation as a faster pour at 3:1, with better control over the bloom structure.
Coffee Blooming Time: How Long Should You Wait?
The correct coffee blooming time is 30 to 45 seconds for most brewing methods. This window gives CO2 enough time to escape without letting the grounds cool significantly before the main pour.
Waiting longer than 60 seconds produces diminishing returns. The CO2 has largely escaped by then, and extended pre-infusion can lead to uneven temperature distribution across the coffee bed.
Visual Indicators of a Perfect Bloom
A healthy bloom is unmistakable once you've seen it. Here's what to look for:
- Doming: The coffee bed rises and forms a gentle dome shape above the dripper. This indicates even CO2 release and good ground saturation.
- Bubbling: Small bubbles break the surface, particularly in the center of the bed. More bubbling means fresher beans.
- Swelling: The volume of the coffee bed visibly increases within the first 10 seconds of the pour.
- Even color change: The grounds shift from dry to uniformly dark without dry patches remaining.
A flat bloom with no visible swelling or bubbling is a clear signal that your beans have gone stale. No amount of technique fixes old coffee.
Degassing Coffee Beans: Why Freshness Changes Everything
Freshness is not a marketing word. It is a measurable chemical state, and degassing coffee beans is the process that defines it.
According to research published in the journal Food Chemistry on coffee degassing, the rate of CO2 release from roasted coffee is highest in the first 24 hours post-roast and tapers significantly over the following week. Beans stored in sealed, one-way valve bags retain freshness longer because CO2 can escape while oxygen cannot enter.
The practical implication: beans roasted more than three weeks ago, stored in an open bag, have already lost the CO2 that makes blooming meaningful. You'll go through the motions of a bloom with no visible activity and wonder what went wrong.
This is why Cuppari Coffee roasts beans only after an order is placed and ships the same day. The beans arriving at your door are still in the active degassing window, which means your bloom will be vigorous, your extraction will be even, and your cup will taste like the roaster intended.
Blooming for Different Roast Levels
Roast level changes the bloom in ways most guides ignore entirely. Here's the practical breakdown:
Light roasts retain CO2 longer because their denser structure slows degassing. They need a slightly longer bloom time, closer to 45 seconds, and benefit from slightly hotter water to open up the cell structure.
Medium roasts are the standard case. The 2:1 ratio, 200°F water, and 30-45 second bloom works reliably here.
Dark roasts degas faster and more completely during the roasting process itself. Their porous structure means CO2 escapes quickly. You may see a shorter, less dramatic bloom. Reduce bloom water temperature slightly and keep the bloom time to 30 seconds. Extending it risks over-extracting bitter compounds that dark roasts already carry in higher concentration.
How Coffee Blooming Affects Flavor Profile and Extraction
The bloom directly determines extraction quality, and extraction quality determines everything about flavor profile. This is not an exaggeration, but it's worth being specific about exactly which flavor compounds are at stake and why the CO2 barrier affects them differently.
The Mechanism: What CO2 Actually Blocks
When hot water contacts un-bloomed grounds, CO2 escaping from the bean's cellular structure forms a thin gas film around each particle. This film is hydrophobic, it actively repels water. The result is not simply "less extraction" across the board. It is selective under-extraction of the most water-soluble compounds first.
The most water-soluble compounds in coffee, the ones that dissolve earliest in the extraction, include fruity acids, floral aromatics, and lighter sweetness compounds. These are also the compounds most responsible for brightness, complexity, and the top notes you detect in the first sip. When CO2 interference blocks early water contact, these compounds are the first casualties. What remains is a cup dominated by the slower-dissolving compounds: heavier bitter alkaloids and woody, earthy notes that need longer contact time to extract.
This is why skipping the bloom often produces a cup that tastes simultaneously flat and bitter, flat because the bright top notes never extracted fully, bitter because the heavier compounds had disproportionate contact time during the uneven main pour.
What a Properly Bloomed Cup Tastes Like vs. an Unbloomed Cup
The sensory difference is consistent enough that experienced tasters can identify it reliably in a side-by-side comparison:
Bloomed cup: Cleaner finish, more defined acidity, perceptible sweetness in the mid-palate, aromatic complexity that matches what you smell during the brew.
Unbloomed cup: Muted aroma despite the same beans, thin or hollow body, acidity that reads as sourness rather than brightness, a bitter finish that lingers longer than expected.
The distinction is most pronounced with light and medium roasts, where the fruity and floral compounds are most abundant. With dark roasts, the bloom still matters, but the flavor gap between bloomed and unbloomed is narrower because dark roasting has already reduced the concentration of delicate volatile compounds.
Extraction Yield: The Numbers Behind the Flavor
Extraction yield, the percentage of the coffee's dry mass that dissolves into your brew water, is the measurable variable underneath all of this. The Specialty Coffee Association's brewing control framework identifies the target extraction yield for most filter coffee as roughly 18-22%. Brews that fall below 18% are under-extracted; above 22%, over-extracted.
Skipping the bloom doesn't simply push the entire brew toward under-extraction. It creates extraction variance within the coffee bed, some zones extract above 22% while others sit below 18%. The cup you drink is an average of those zones, which is why it can taste simultaneously sour (under-extracted areas) and bitter (over-extracted areas) in the same sip. Blooming narrows that variance by giving every particle an equal starting point before the main extraction begins.
As documented in the Coffee Quality Institute's brewing fundamentals guide, even saturation of the coffee bed is one of the primary variables controlling extraction yield and flavor balance.
How Roast Level Changes the Flavor Impact of Blooming
This is the angle most extraction guides miss entirely. The flavor stakes of blooming are not equal across roast levels:
Light roasts carry the highest concentration of volatile aromatic compounds and delicate acids. They also retain CO2 longest. The combination means that skipping the bloom on a light roast produces the most dramatic flavor penalty, you lose the very compounds that make a light roast worth buying. Bloom time and ratio matter most here.
Medium roasts show a clear but moderate improvement with blooming. The flavor gap between bloomed and unbloomed is noticeable to most drinkers without requiring a trained palate.
Dark roasts have already lost much of their volatile complexity during roasting. The CO2 content is lower, and the remaining flavor compounds are more robust and slower to extract. The bloom still improves extraction evenness, but the perceptible flavor difference is smaller. If you're brewing dark roast and skipping the bloom, you're leaving less on the table than you would be with a light roast, though you're still leaving something.
The Bitterness Misconception
Many people attribute bitterness to roast level or grind size when the actual cause is uneven extraction from a skipped bloom. The mechanism is straightforward: over-extracted zones in the coffee bed produce harsh, bitter compounds, specifically certain chlorogenic acid degradation products and caffeine-adjacent alkaloids, that are disproportionately soluble at high extraction rates. These compounds dominate the cup even when the majority of the brew is under-extracted, because bitterness is perceptually powerful at low concentrations.
If your coffee tastes bitter but you're using a medium roast and a medium grind, add the bloom before adjusting anything else. It is the most common overlooked variable, and it costs nothing to test.
Coffee Blooming Across Brewing Methods: Pour-Over, French Press, and More
The bloom applies to every brewing method that uses ground coffee. The mechanics differ slightly, but the principle is identical.
Pour-over and Chemex: The bloom is most visible and most critical here. The open coffee bed and gravity-fed extraction make even saturation essential. Use a gooseneck kettle, pour slowly in a spiral pattern, and wait the full 30-45 seconds before continuing.
French press: Add all your grounds, pour bloom water over the entire surface, place the lid on without pressing, and wait 30-45 seconds. Then add the remaining water and proceed with your standard steep time. The bloom is less dramatic in a French press because there's no drainage, but it still improves extraction evenness.
Drip coffee maker: Most automatic drip coffee makers do not have a bloom function. Higher-end models include a pre-infusion or bloom setting that pauses the brew cycle after the first water release. If your machine lacks this, manually pre-wet the grounds with a small amount of hot water before starting the brew cycle.
AeroPress: The bloom works well here. Add grounds, pour bloom water, stir once, and wait 30 seconds before adding the remaining water. The pressurized extraction that follows benefits from an even starting point.
Troubleshooting a Failed Coffee Bloom
Most bloom failures trace back to one of three causes: stale beans, incorrect water temperature, or insufficient water volume.
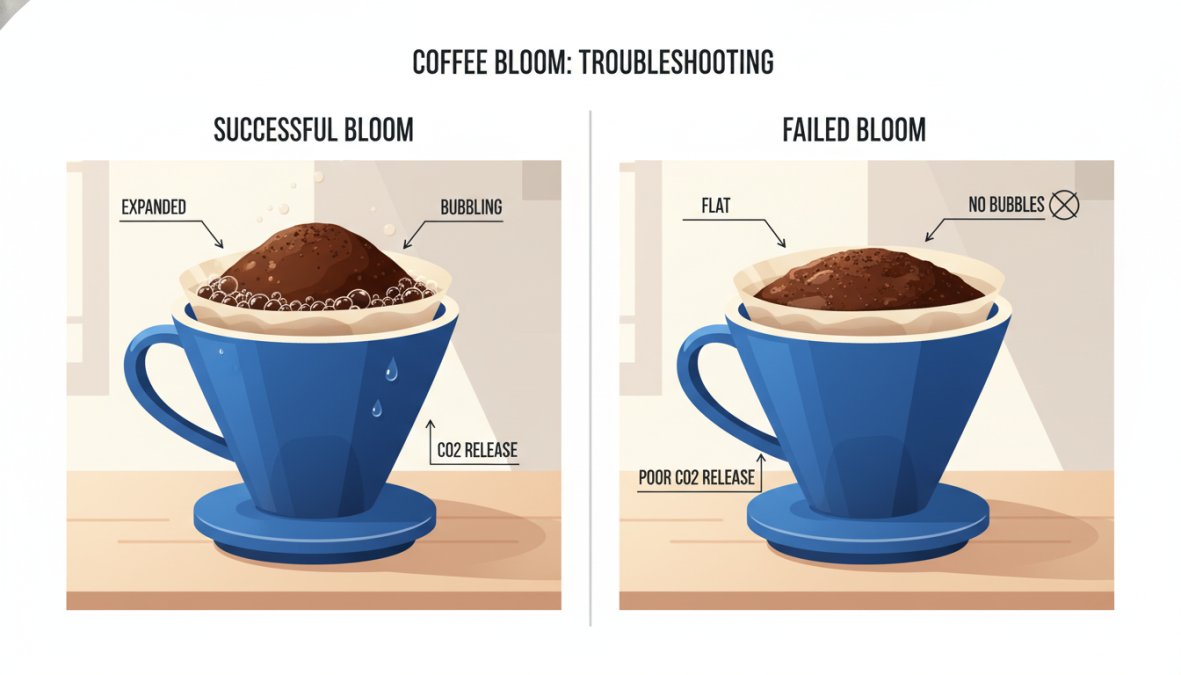
No visible bloom activity: The beans are stale. CO2 has already escaped. There is no technique fix for this. Switch to fresher beans. If you're buying pre-ground coffee, this problem is compounded because grinding dramatically accelerates degassing.
Bloom is uneven with dry patches: Your pour was too fast or too concentrated in one area. Slow down and use a circular spiral pour that covers the entire coffee bed before the water pools in the center.
Bloom collapses immediately: Water temperature is too low. Below 185°F, CO2 release slows significantly and the bloom won't develop properly. Check your kettle temperature with a thermometer.
Over-aggressive bloom that disrupts the filter: Extremely fresh beans, particularly those roasted within 24-48 hours, can bloom so forcefully that they push grounds up the filter walls. Rest beans for at least three days post-roast. Cuppari Coffee ships same-day after roasting, so your beans arrive fresh enough to need this rest period before their first brew.
Bitter taste despite blooming correctly: Check your grind size and water temperature. A bloom solves the CO2 problem but doesn't compensate for a grind that's too fine or water that's too hot for the roast level.
For anyone troubleshooting persistently flat results, the Specialty Coffee Association's brewing control resources offer detailed extraction yield guidance that goes beyond the bloom itself.
The challenge most coffee drinkers face isn't access to good beans. It's receiving beans fresh enough to make the bloom meaningful. Cuppari Coffee roasts only after your order is placed and ships the same day, so every bag arrives in the active degassing window where blooming produces real results. With free shipping on all U.S. orders and a selection spanning single origin, blends, and flavored coffees, getting a genuinely fresh bloom is straightforward. Add to cart and taste the difference that roast-to-order freshness makes.
Frequently Asked Questions
Why do you bloom coffee?
Coffee blooming releases trapped carbon dioxide from freshly roasted coffee grounds before full brewing begins. If CO2 is not released first, it interferes with water absorption and creates uneven extraction. Blooming allows hot water to saturate the coffee bed more evenly, which improves flavor clarity, enhances aroma, and produces a more balanced, full-flavored cup with better acidity and less unwanted bitterness.
What happens if you don't bloom coffee?
Skipping the bloom means CO2 escaping from the coffee grounds actively repels water during brewing. This leads to uneven extraction, where some grounds are over-extracted and others under-extracted. The result is often a flat, sour, or bitter cup that lacks the depth and aroma you'd expect from quality, freshly roasted beans. Blooming is a simple step that makes a noticeable difference in the final cup.
How long should you let coffee bloom?
The ideal coffee blooming time is typically 30 to 45 seconds for most brewing methods. Very freshly roasted beans, especially those roasted within the last week, may need up to 60 seconds due to higher CO2 levels. You'll know the bloom is complete when the bubbling and swelling of the coffee bed visibly slows down. Lighter roasts may bloom slightly faster than darker roasts.
Does coffee bloom happen with old beans?
Old or stale coffee beans produce little to no bloom because they have already lost most of their carbon dioxide through degassing over time. If you pour water over your coffee grounds and see minimal bubbling or swelling, it's a strong sign the beans are no longer fresh. This is one of the most reliable visual tests for bean freshness, a robust, domed bloom indicates high-quality, freshly roasted coffee.
Is blooming necessary for all coffee brewing methods?
Blooming is most impactful for manual brewing methods like pour-over, Chemex, and AeroPress, where you control the pour. It also benefits French press brewing. Automatic drip coffee makers generally don't allow for a manual bloom step, though some specialty models include a pre-infusion setting that mimics it. Espresso machines handle degassing differently through pressure, so a traditional bloom step is less applicable there.
What is the best coffee bloom ratio?
The most commonly recommended bloom ratio is 2:1, two grams of water for every one gram of coffee grounds. For example, if you're brewing with 20 grams of coffee, use about 40 grams of water for the bloom. This amount is enough to fully saturate the coffee bed and trigger CO2 release without over-diluting the brew. After the bloom period, continue with the rest of your water-to-coffee ratio as normal.
This article was written using GrandRanker