

Last Updated: October 23, 2026
Quick Summary
To remove flavored coffee oils from your grinder, brush out loose grounds with a dry brush, wipe oily surfaces with a barely damp microfiber cloth, and disassemble removable burrs if your manual permits. Regular cleaning every 1-3 weeks prevents rancid oil from transferring to plain coffee and maintains consistent grind quality.
- Flavored coffee oils oxidize and turn rancid, transferring stale flavor to plain beans if not cleaned regularly
- Dry brushing alone does not remove oil film; you must wipe with a damp microfiber cloth to lift oily residue
- Clean weekly if you grind flavored coffee daily, or every 2-3 weeks for occasional use
- Always unplug the grinder and check your manual before removing burrs; pressing a lower burr off its shaft is the most common way users destroy a grinder
- Run a small batch of plain beans through after cleaning to purge residual dust and confirm proper grind setting
Table of Contents
- Why Flavored Coffee Leaves Oily Residue in Your Grinder
- What You'll Need Before Cleaning
- How to Clean Coffee Grinder Burrs and Remove Oil Buildup
- Using Coffee Grinder Cleaning Tablets to Remove Residue
- How Often to Clean a Coffee Grinder After Flavored Beans
- Removing Persistent Flavored-Coffee Aroma and Taste
- Common Mistakes to Avoid When Cleaning Your Grinder
- Frequently Asked Questions
Why Flavored Coffee Leaves Oily Residue in Your Grinder
The oils oxidize and turn rancid, and that stale flavor transfers to your next batch even if you switch to plain beans.
Flavored coffee oils are sticky and don't dry out like water, so a quick rinse won't remove them, you need active cleaning.
The Specialty Coffee Association's guidance on grinder maintenance emphasizes that flavored coffee requires more frequent cleaning than single-origin or blend coffees.
What You'll Need Before Cleaning
- Grinder brush or hard-bristle toothbrush
- Dry towels or paper towels
- Small vacuum with brush attachment (optional but helpful)
Never use water directly on electrical components; keep moisture away from the motor and connections.
If your grinder has removable burrs, check your manual first. The OutIn Fino Portable Electric Coffee Grinder has an ergonomic rotating hopper that opens in seconds, making burr access straightforward.
For wiping oily surfaces, the Barista Towel Set (2-Pack) works well, the microfiber absorbs coffee residue without leaving lint behind.
Have plain coffee beans ready: after cleaning, run a small batch through to season the burrs and remove cleaning residue.
How to Clean Coffee Grinder Burrs and Remove Oil Buildup
To remove flavored coffee oils effectively requires a sequence, not a scrub. The oils sit on the burr edges, chamber walls behind the burrs, and discharge chute, each needs a different tool. Work top-down so you don't push oil back onto cleaned surfaces.
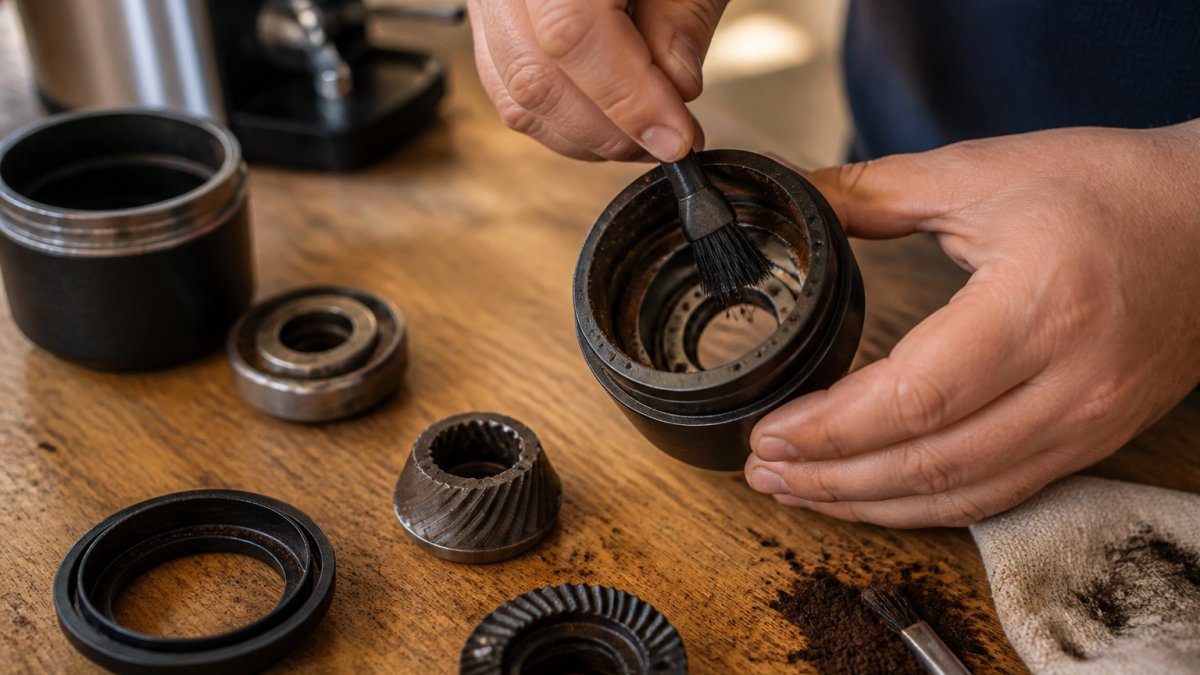
First, identify your burr type, it determines what you can safely remove.
- Conical burrs (common on hand grinders and many espresso grinders): the inner cone lifts out after you remove the retaining nut or the hopper collar. The outer ring usually stays seated in the housing.
- Flat burrs (common on commercial-style and many home espresso grinders): the top carrier plate holds the upper burr and is typically secured by three screws. The lower burr is often pressed or screwed into the motor shaft and should not be removed by the user.
- Integrated/ceramic burrs (common on budget blade-and-burr hybrids and some portable grinders): the burr set is not user-removable. Clean in place only.
Step 1: Unplug and Disassemble Safely
Unplug the grinder. Not off, unplugged. A switched-off grinder can still start if the switch is bumped or a timer circuit fires.
Remove the hopper (most twist counterclockwise a quarter turn and lift off). Empty remaining beans into a sealed bag, flavored beans will re-oil the hopper if left in.
Remove the catch cup or grounds bin.
If your burrs are removable per the manual, take them out now, keeping screws in a small dish.
Step 2: Brush Out Loose Grounds
Start with a dry grinder brush (a firm toothbrush works).
Brush the chamber walls and behind the burr carrier, angling bristles into the seam where the carrier meets the housing, that ring is where rancid flavor hides.
Brush the chute last and brush it toward the exit, not back into the chamber.
Tap parts gently over a trash bin. Do not strike burrs against a hard surface, chipped cutting edges change grind consistency permanently.
Step 3: Wipe Down Oily Surfaces
Dry brushing lifts loose grounds but not the oil film. Wipe first with a dry microfiber towel to capture what brushing loosened.
Then dampen a microfiber cloth and wring it until barely moist.
Do not let water run into the motor housing, the shaft bearing, or any switch opening.
Dry every part immediately with a clean dry towel, then let parts air dry 10-15 minutes before reassembly.
Step 4: Vacuum Out Remaining Particles
A small vacuum with a brush attachment pulls fine grounds from the chute and the seam around the burr carrier. Use low suction and keep the nozzle moving, holding it against a bearing seal can pull lubricant out.
No vacuum? Skip this step, brushing and wiping do most of the work.
Step 5: Reassemble Without Misaligning the Burrs
This is where most cleaning jobs go wrong. Reassemble in reverse order and check alignment before grinding beans.
- Seat the lower burr or carrier fully. It should sit flush with no rocking.
- Install the upper burr carrier with its tab or notch aligned to the housing mark. Tighten screws in a star pattern, snug only, over-tightening warps the carrier and changes grind setting.
- Replace the hopper and twist to lock.
- Set the grind adjustment to a coarse setting, then run the grinder empty for 5-10 seconds. Listen for rubbing or scraping. If you hear metal contact, stop and re-seat the burrs.
- Grind a small batch of plain beans and discard it. This purges cleaning dust and confirms the grind setting is in range.
If the grinder sounds normal but the grind is suddenly inconsistent, the upper burr carrier probably isn't seated. Disassemble, check tab alignment, and reseat.
Using Coffee Grinder Cleaning Tablets to Remove Residue
Cleaning tablets are one tool in a set, and choosing the wrong one for your buildup level is how people damage burrs or void warranties. Here's how the methods compare.
| Method | Best for | Removes oil? | Risk |
|---|---|---|---|
| Dry brushing | Loose grounds, light dust | No, lifts grounds only | Low; stiff bristles can dull edges if scrubbed hard |
| Damp microfiber wipe | Light oil film | Partially | Water near bearings or switches |
| Vacuum with brush attachment | Chute and seam debris | No | Low; high suction can pull bearing lubricant |
| Grinder-cleaning tablets | Light-to-moderate oil on burrs | Yes, via absorbent powder | Some manufacturers void warranty if non-approved pellets are used |
| Uncooked oats | Light oil, budget option | Partially | Oat dust cakes in chute; can clog fine espresso grinders |
| Isopropyl alcohol (70%) on a cloth | Stubborn oil on metal only | Yes | Flammable; damages some plastics and seals; never on ceramic burrs |
How Cleaning Tablets Actually Work
Most grinder-cleaning tablets are compressed grain- or plant-fiber based. Ground up, they become a fine, slightly abrasive powder that absorbs oil off the burr faces and carries it out of the chamber, a gentle scouring medium, not a solvent.
Tablets work best on light-to-moderate oil film. On heavy, sticky flavored-coffee residue the powder passes over the oil rather than lifting it, so you still need manual brushing and wiping.
Tablet Procedure
- Empty the hopper completely. Residual beans will mix with the powder and waste both.
- Set the grind to a medium setting, not the finest, which can stall a grinder on dense pellets.
- Add the dose recommended on the package (typically a small scoop, roughly the volume of one bean dose).
- Run the grinder for 30-60 seconds, or until the pellets have passed through.
- Discard the powder. Do not brew it.
- Grind a small batch of plain beans and discard to purge residual powder.
If the grinder stalls, stop immediately and empty it. Stalling on pellets can overheat the motor.
When to Skip Tablets
- Heavy flavored-coffee buildup: go straight to disassembly, brushing, and wiping. Tablets will not cut sticky oil.
- Ceramic burrs: some manufacturers advise against abrasive pellets on ceramic. Confirm in the manual.
- Grinders under warranty with a specified cleaning product: use the approved product only.
A Note on Oats and Alcohol
Uncooked oats are the budget version of cleaning tablets and work the same way, but oat flour packs into narrow chutes and can clog espresso grinders. Use oats only on coarse-grind drip grinders, and vacuum the chute afterward.
Isopropyl alcohol (70%) on a cloth cuts stubborn oil on metal burrs and stainless chambers, but it attacks some plastics and rubber seals and is flammable.
How Often to Clean a Coffee Grinder After Flavored Beans
If you grind flavored beans occasionally, clean every 2-3 weeks, light use means less oily buildup.
If you grind flavored coffee daily, clean weekly. Daily use deposits more oil each time. Weekly cleaning prevents heavy residue from forming.
After switching from flavored to plain coffee, run a small batch through your grinder first. This purges flavored-coffee oils before you brew.
Many coffee enthusiasts keep two grinders: one for flavored coffee and one for plain beans. This eliminates flavor transfer completely. It's an option if you drink both types regularly.
For reference, the article on how often to clean coffee grinder burrs provides a detailed maintenance schedule based on bean type and usage patterns.
Removing Persistent Flavored-Coffee Aroma and Taste
Sometimes oily residue leaves a lingering flavor even after cleaning.
Run a batch of plain coffee beans through your grinder immediately after cleaning.
Repeat this purging process 2-3 times if the flavor persists. Each batch removes more residual aroma.
For stubborn tastes, try grinding plain beans for 30-60 seconds without stopping.
If the taste still lingers after multiple purges, the oily residue may be trapped deep inside.
Some flavored coffees are oilier than others.
Understanding flavored coffee better helps prevent heavy buildup. The Flavored Coffee Beans Fresh Roast guide explains how different flavor profiles affect your grinder and offers tips for choosing beans that are easier to clean.
Common Mistakes to Avoid When Cleaning Your Grinder
Using too much water. Water and electrical components don't mix.
Forgetting to unplug. Always disconnect power before opening your grinder.
Skipping the drying step. Moisture left inside promotes rust and corrosion.
Disassembling incorrectly. Forcing burrs or parts can break them.
Reassembling in the wrong order. Take a photo before disassembling.
Not purging after cleaning. Running plain beans through removes cleaning residue.
At Cuppari Coffee, we understand that flavored beans require special care. Our best coffee grinders for fresh beans guide helps you choose a grinder that handles both flavored and plain coffee effectively.
Frequently Asked Questions
Will oily coffee beans ruin my grinder?
Flavored coffee oils won't permanently damage your grinder, but they do build up over time and affect performance. Oil residue can cause uneven grinding, flavor transfer to regular coffee, and reduced grinding speed. Regular cleaning after using flavored beans prevents these issues and keeps your grinder working at peak performance. Most burr grinders are designed to handle occasional flavored-coffee use if you clean them properly afterward.
How often should I clean a grinder after using flavored coffee beans?
If you use flavored coffee, clean your grinder regularly to prevent oil buildup. After switching from flavored to plain coffee, run a small batch of plain beans through your grinder first to purge residual flavor, then clean your grinder thoroughly with brushing and wiping.
Can I use water to clean my coffee grinder?
Avoid running water directly through your grinder, excess moisture can damage electrical components and cause rust on burrs. Instead, use a damp towel to wipe oily surfaces, then dry immediately with a paper towel. For burr grinders, disassemble removable parts and wipe them gently with a barely damp cloth. Never submerge your grinder or let water pool inside the grind chamber. If moisture enters electrical areas, allow the grinder to air-dry completely before use.
What's the safest way to remove coffee oil from grinder burrs?
The safest method combines mechanical and dry cleaning: unplug the grinder, brush burrs with a hard-bristle toothbrush or grinder brush to dislodge loose grounds and oil, then wipe with a dry paper towel. For stubborn residue, use grinder-cleaning tablets. Avoid solvents or abrasive scrubbing, which can damage the burr surface. Always consult your grinder's manufacturer instructions before disassembly to avoid voiding your warranty.
